-
Quick3DPlan
-
-
- Tips to download the installer correctly
- How to buy the Quick3DPlan or Quick3DCloset subscription
- How to reset the password in Quick3DPlan or Quick3DCloset
- How to check my program's version
- How to recover a project when the software was closed unexpectedly
- How to download Quick3DPlan for Mac again from the Mac App Store
- How to transfer the license to another computer (*Quick3DPlan 12 and earlier)
-
- ERROR: SetupNew\setup.cpp (140)
- ERROR: File System 0004. : c:\Quick3Dplan/???.dll : curpath=C:/Quick3Dplan
- Feature transfer error
- Runtime Error!
- Error message: "The application has failed to start because its side-by-side configuration is incorrect"
- Error message: “The requested operation requires elevation”
- Error message: "This app can't run on your PC"
-
- How to set up the "3D image detail" level
- How to customize catalog measures in Quick3DPlan
- How to insert your company logo to the impressions
- How to print a "3-view window" of the design
- How to print a photorealistic image or render in Quick3DPlan or Quick3DCloset
- How to print plans and sketches in PDF to be able to send them by e-mail to your clients
- How to print a dimensioned front elevation
-
- How to place a cabinet in a non 90º angle corner
- How to place cabinets, countertops and upstands in a corner with a pillar
- How to simulate a ceiling
- How to fill up a small gap between a cabinet and a non-perpendicular wall
- How to make a wall with different backsplashes
- How to put 2 materials on the floor of the room
- How to create beams in the architecture
- How to shorten a previously inserted partition wall
-
- How to place a cabinet in a non 90º angle corner
- How to place cabinets, countertops and upstands in a corner with a pillar
- How to fill up a small gap between a cabinet and a non-perpendicular wall
- How to apply GOLA type handles to a selected door
- How to erase the handles
- How to insert an L-shape corner with a different door width
- How to make a peninsula or island in the middle of the kitchen with a “breakfast bar”
- How to place a 35-cm folding door cabinet above a refrigerator
- How to place a 60-cm high fridge under a worktop
- How to set the number of drawers in a unit
- How to insert a blind corner for a sink
- How to place 2 rows of wall units with different depths
- How to place a tall cabinet with doors at the top and bottom, and 2 shelves in the center
- How to place a sink unit with drawers instead of doors
- How to put a worktop on top of a dishwasher or washing machine
- How to remove cornices and light pelmets from wall cabinets
- How to extend a cabinet’s countertop to make a “breakfast bar”
- How to adjust the sides to align them with the door
- How to add a plinth to cover the legs of a cabinet
- How to put a “ceiling scribe” cornice
- How to place backsplashes between base and wall units
- How to place a side panel made of the same material as the countertop to create a "waterfall countertop"
- How to insert a corner unit with an upstand in just one side only
- Mostrar artículos restantes (8) Contraer artículos
-
- How to adjust the "Closets module" window to be able to see the lower buttons (in the case they are not visible)
- How to hide the closet doors to see the interior in Quick3DPlan
- How to place a vertical divider that fits in a selected space in Quick3DPlan
- How to reduce the depth of one of the modules to adapt it to a pillar in Quick3DPlan
- How to "simulate" an L-shaped closet, a closet with 2 fronts, or a corner closet in Quick3DPlan
- How to make a "built-in closet” in Quick3DPlan
- How to change the number of modules in cabinets with sliding and swing doors in Quick3DPlan
- How to create “hanging closets” in Quick3DPlan
-
- How to use perspectives in Quick3DPlan or Quick3DCloset
- How to use the option to create photorealistic images or "Renders"
- How to activate the “image history” in the Render window
- How the lights work and how to configure them correctly
- How to show elevations of furniture in narrow kitchens
- How to save a picture of a kitchen dimensioned elevation
- How to change the door, baseboard and worktop colour and material
- How to place a side panel made of the same material as the countertop to create a "waterfall countertop"
-
-
Quick3DCloset
-
- 1. Drawing the architecture in Quick3DCloset.
- 2. Create a closet #1: Catalogs, Doors, and Structure.
- 3. Create closet #2: Element distribution and pricing.
- 4. Changing materials in Quick3DCloset.
- 5. Views and perspectives, and hiding closet doors in Quick3DCloset.
- 6. Lights and render in Quick3DCloset.
-
-
- Tips to download the installer correctly
- How to buy the Quick3DPlan or Quick3DCloset subscription
- How to reset the password in Quick3DPlan or Quick3DCloset
- How to check my program's version
- How to recover a project when the software was closed unexpectedly
-
- ERROR: SetupNew\setup.cpp (140)
- ERROR: File System 0004. : c:\Quick3DCloset/???.dll : curpath=C:/Quick3DCloset
- Feature transfer error
- Runtime Error!
- Error message: "The application has failed to start because its side-by-side configuration is incorrect"
- Error message: “The requested operation requires elevation”
- Error message: "This app can't run on your PC"
-
- How to set up the "3D image detail" level
- How to insert your company logo to the impressions
- How to print a "3-view window" of the design
- How to print a photorealistic image or render in Quick3DPlan or Quick3DCloset
- How to print plans and sketches in PDF to be able to send them by e-mail to your clients
-
- How to change the accessories material
- How to hide the closet doors to see the interior in Quick3DCloset
- How to place a vertical divider that fits in a selected space in Quick3DCloset
- How to create a pocket to adapt the closet to a pillar in Quick3DCloset
- How to “simulate” an L-shaped closet, a closet with 2 fronts, or a corner closet in Quick3DCloset
- How to make a “built-in closet” in Quick3DCloset
- How to create “hanging closets” in Quick3DCloset
-
-
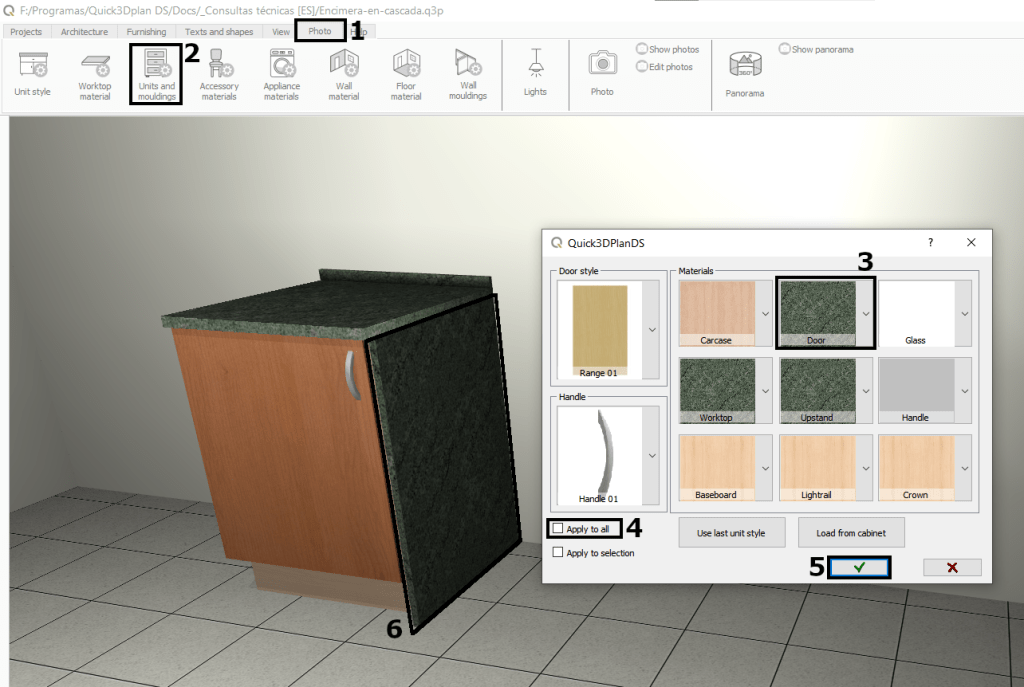
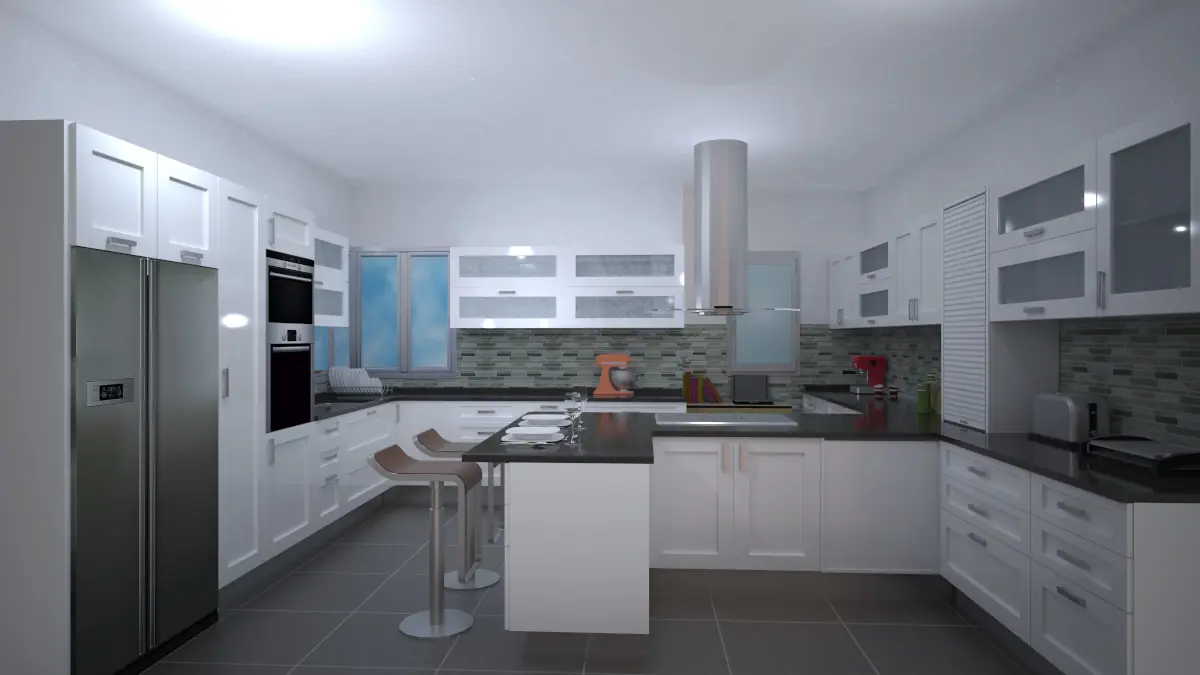
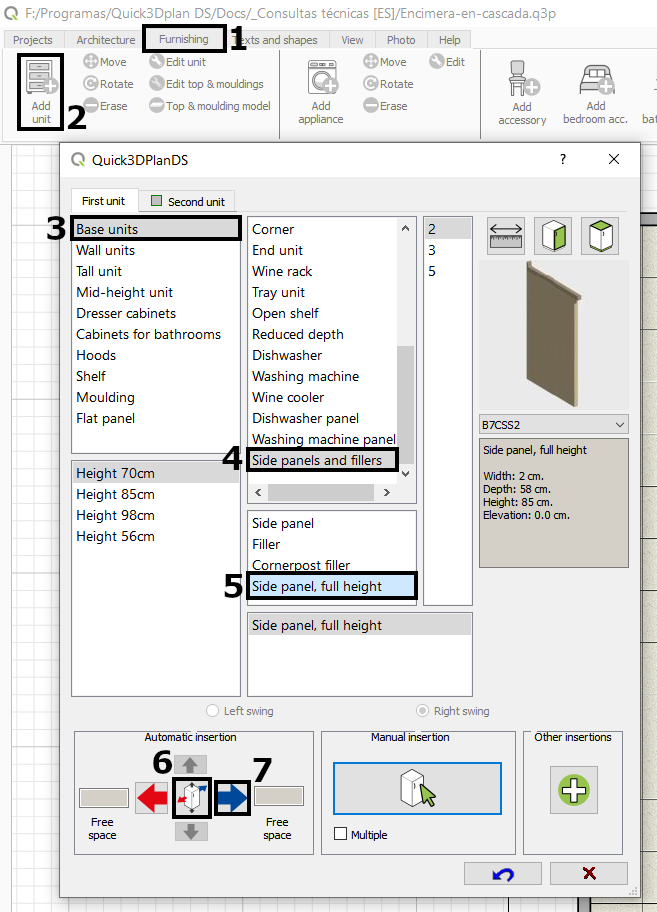
How to place a side panel made of the same material as the countertop to create a “waterfall countertop”
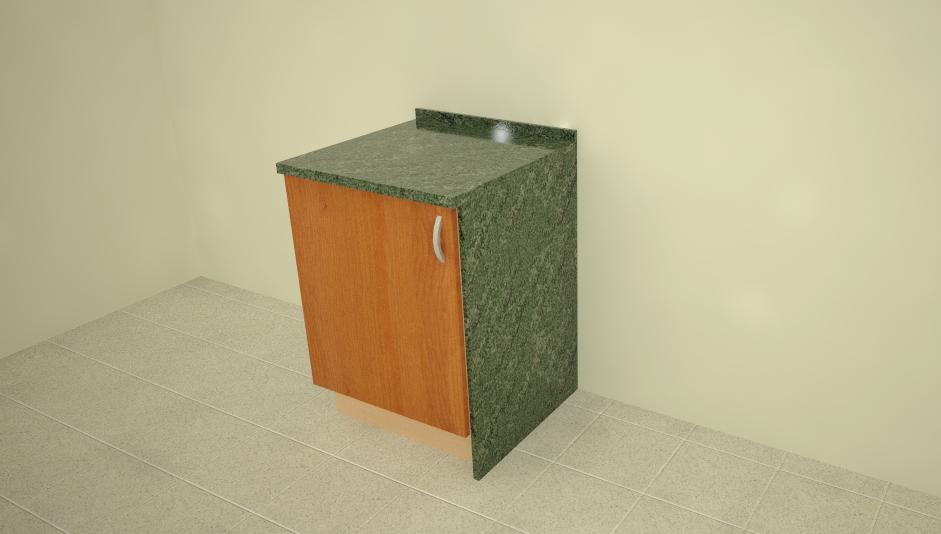
To simulate a “waterfall countertop” follow these steps:
First step
Add a “Side Panel to Floor” element next to the cabinet where you want to place the “waterfall countertop.” To do this, go to “Furnishing” [1] and “Add unit” [2]. In the furniture insertion window, select “Base Units” [3], “Side panels and fillers” [4], “Side panel, full height” [5]. Now, if you haven’t selected the cabinet where you want to add this waterfall countertop as the “base cabinet“, click on the “Change Base Cabinet” button [6] and select it. Finally, click on the “Automatic Insertion” button [7] on one of the sides of the cabinet:
Second step
Change the material of the “Side panel”, so that it is the same as the countertop. To do this, follow these steps:
- Click on the “Photo” section.
- Click on the “Units and mouldings” option.
- In the “Door” option, select the same material as the worktop.
- Uncheck the “Apply to all” option.
- Click on the “OK” button.
- Select the “Side panel, full height” to apply the material (NOTE: It may be tricky to select the “Side panel, full height” element; try changing the perspective, moving the “Side panel, full height”, and once the material is changed, placing it back in position, etc.)
You can see it in this screenshot: